

The Israel ETA-IL (Electronic Travel Authorization) is a mandatory online travel permit for visa-exempt visitors entering Israel. Applying takes about 10 minutes through the official PIBA (Population and Immigration Authority) portal, costs 25 NIS, and most approvals arrive within minutes. This guide walks you through every step so you can complete your application without errors.
What Is the Israel ETA-IL?
The ETA-IL is Israel’s electronic travel authorization system, launched in 2024 and mandatory for all visa-exempt travelers since January 1, 2025. It replaces the previous visa-free entry system where travelers could simply arrive with a passport.
The authorization is digitally linked to your passport – there is no physical sticker or stamp. Israeli border control verifies your ETA-IL status electronically when you arrive at Ben Gurion Airport or any other entry point.
Key facts at a glance:
- Cost: 25 NIS (approximately $7 USD)
- Validity: 2 years or until your passport expires (whichever comes first)
- Processing time: Usually minutes, up to 72 hours in some cases
- Entry type: Multiple entries during the validity period
- Application portal: israel-entry.piba.gov.il
For full details on eligibility and required documents, see our ETA-IL requirements guide.
Who Needs to Apply?
You need an ETA-IL if you are a citizen of a visa-exempt country traveling to Israel for:
- Tourism or vacation
- Business meetings or conferences
- Transit through Israel
- Short-term visits (up to 90 days)
You do NOT need an ETA-IL if you:
- Hold an Israeli passport or national ID card
- Have a valid Israeli visa (B1, B2, A2, A3, A4)
- Are a Palestinian Authority resident with a valid permit
- Hold a diplomatic or official passport (separate procedures apply)
Over 100 countries are currently visa-exempt for Israel, including the United States, United Kingdom, Canada, Australia, all EU member states, Japan, South Korea, and Brazil. If your country is not on the visa-exempt list, you must apply for a traditional visa instead.
What You Need Before You Start
Gather these items before opening the application form. Having everything ready prevents timeouts and ensures you can complete the process in one sitting.
Required documents and information:
- A valid passport with at least 6 months remaining before expiration
- A working email address (approval is sent here)
- A credit or debit card for the 25 NIS fee payment
- Your travel dates (approximate – exact dates are not required)
- Your accommodation address in Israel (hotel name or host address)
Helpful but optional:
- A digital passport photo (some nationalities may be asked to upload one)
- Your flight number or booking reference
- Details of previous visits to Israel, if any
Your passport must be an ordinary passport. Emergency travel documents, temporary passports, and certain other document types may not be accepted by the system.
Step-by-Step: How to Apply for Your Israel ETA
Follow these steps to complete your application on the official PIBA portal.
Step 1: Go to the Official Application Portal
Open your web browser and navigate to israel-entry.piba.gov.il. This is the only official site for Israel ETA applications. Avoid third-party websites that charge extra fees – the official fee is 25 NIS only.
The portal is available in English, Hebrew, Arabic, Russian, and several other languages. Select your preferred language from the menu at the top of the page.
Step 2: Start a New Application
Click the “Apply for ETA-IL” button on the homepage. You will be taken to the application form. No account registration is required – you can apply directly.
The system will ask you to confirm that you have read and understood the terms. Check the acknowledgment box and proceed.
Step 3: Enter Your Personal Details
Fill in your personal information exactly as it appears on your passport:
- Full name (first name, middle name if applicable, last name)
- Date of birth
- Gender
- Nationality / country of citizenship
- Passport number
- Passport expiration date
Double-check every field. A typo in your name or passport number is the most common reason for application delays or rejections. The system cross-references your details against your passport – any mismatch can cause problems at the border.
Step 4: Provide Your Travel Information
Enter your travel details:
- Purpose of visit (tourism, business, transit, other)
- Expected date of arrival in Israel
- Address in Israel (hotel name and city, or residential address)
- Contact phone number (with country code)
- Email address (this is where your approval will be sent)
Your email address is critical. If there is a typo, you will not receive your approval notification. Use an email you check regularly and that can receive messages from government domains.
Step 5: Answer Security Questions
The application includes a short section of security-related questions. Answer all questions honestly. These typically cover:
- Previous visa refusals or deportations from any country
- Criminal history
- Previous overstay in Israel or any other country
- Connections to prohibited organizations
Providing false information can result in permanent entry bans. If you have a complicated travel history, answer truthfully – minor issues are far less damaging than dishonesty.
Step 6: Review Your Application
Before submitting, review all entered information on the summary screen. Check:
- Name spelling matches your passport exactly
- Passport number is correct (no swapped digits)
- Email address has no typos
- Travel dates are reasonable
You can go back and edit any section before submitting.
Step 7: Pay the 25 NIS Fee
The application fee is 25 Israeli New Shekels (approximately $7 USD). Payment is made by credit or debit card through the secure payment gateway.
Accepted cards typically include Visa, Mastercard, and sometimes American Express. The transaction is processed in NIS, so your bank may apply a small foreign currency conversion fee.
After successful payment, you will receive a payment confirmation email and your application enters the processing queue.
What Happens After You Submit?
Once your application is submitted and payment is confirmed, here is what to expect:
Processing Time
Most ETA-IL applications are approved within minutes. The system performs an automated background check, and if everything is clear, your authorization is issued almost immediately.
However, some applications require manual review, which can take up to 72 hours. Factors that trigger manual review include:
- Names that match security watchlist entries (common names especially)
- Previous travel to certain countries
- Incomplete or inconsistent information
- High application volumes during peak travel seasons
If your application has been pending for more than 72 hours, contact PIBA support through the official portal.
Receiving Your Approval
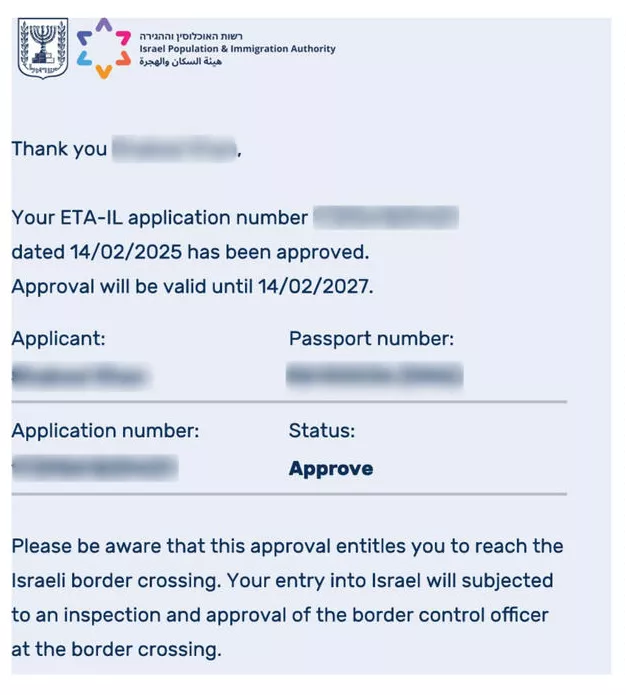
Your ETA-IL approval is sent to the email address you provided. The email contains:
- Your ETA-IL authorization number
- The validity period (start and end dates)
- Your passport details as confirmed
- A link to check your status online
Important: Save the authorization number. While the ETA-IL is digitally linked to your passport and border officers can see it in their system, having the number as backup is useful if any technical issues arise.
If you do not receive an email within 48 hours, check your spam or junk folder. If it is not there, log in to the portal and check your application status using your passport number and application reference.
Checking Your Application Status
You can check the status of your application at any time through the official portal. Visit check your ETA-IL status for a detailed guide on the status-checking process.
Tips for a Smooth Application
Follow these tips to avoid common problems:
- Apply at least 2 weeks before travel. While most approvals are instant, giving yourself buffer time handles any unexpected delays.
- Use a desktop or laptop computer. The portal works on mobile devices, but a larger screen makes it easier to verify details.
- Keep your passport handy while applying. You will need to reference specific numbers and dates from the photo page.
- Use a personal email, not a work email. Corporate email filters sometimes block government communications.
- Do not apply multiple times. Submitting duplicate applications creates confusion and may delay processing.
- Check your passport expiration date first. If your passport expires in less than 6 months, renew it before applying.
Common Application Mistakes to Avoid
These errors cause the most problems for applicants:
Name does not match passport. Your ETA-IL name must match your passport exactly. If your passport shows “JOHN WILLIAM SMITH,” do not enter “John Smith” or “John W. Smith.”
Wrong passport number. Transposing digits (writing 12345 instead of 12354) means your ETA-IL is linked to a nonexistent passport. You will be denied entry.
Using an expired passport. Your passport must be valid for at least 6 months beyond your planned entry date. Apply only with your current, valid passport.
Incorrect email address. A typo means you never receive your approval. Double-check before submitting.
Applying with the wrong passport. Dual citizens should use the passport they plan to enter Israel with. If you hold both US and UK passports and plan to enter on your US passport, apply with the US passport details.
What If Your Application Is Rejected?
A small percentage of ETA-IL applications are rejected. Common reasons include:
- Name matches a security watchlist entry
- Previous overstay or immigration violation in Israel
- Incomplete application or missing information
- Passport validity issues
If your application is rejected, you have two options:
- Reapply with corrected information if the rejection was due to a typo or missing data. You will need to pay the 25 NIS fee again.
- Apply for a traditional visa through the nearest Israeli embassy or consulate if the rejection is based on eligibility issues.
For more information on rejection reasons and next steps, see our ETA-IL rejection guide.
Frequently Asked Questions
How long is the Israel ETA-IL valid?
The ETA-IL is valid for 2 years from the date of approval, or until your passport expires, whichever comes first. If you get a new passport during this period, you must apply for a new ETA-IL.
Can I apply for someone else?
Yes, you can submit an application on behalf of another person, such as a child or elderly family member. However, you need all of their passport information and must use their details, not yours.
Do children need their own ETA-IL?
Yes. Every traveler, including infants and children, needs their own ETA-IL. Each application requires the child’s individual passport information.
Can I extend my ETA-IL?
No. The ETA-IL cannot be extended. If it expires while you are in Israel, you need to apply for a new one before your next entry. However, the ETA-IL does not limit your stay – it only controls entry. Your allowed stay duration is determined by border control upon arrival (typically 90 days for tourists).
What if my passport expires before my ETA-IL?
Your ETA-IL is automatically invalidated when your passport expires. You must apply for a new ETA-IL with your new passport.
Is the 25 NIS fee refundable if I am rejected?
No. The 25 NIS application fee is non-refundable regardless of the outcome of your application.
Can I work in Israel with an ETA-IL?
No. The ETA-IL is for tourism, business meetings, and transit only. To work in Israel, you need a B1 work visa. See our Israel visa types guide for details.
What if I change my travel dates after getting approved?
You do not need to update your ETA-IL if your travel dates change. The authorization is valid for 2 years regardless of the dates you entered during the application. You can enter Israel on any date within the validity period.
Next Steps
Now that your ETA-IL is approved, here is what else to prepare for your trip:
- Check the ETA-IL fee breakdown for a complete cost overview
- Review Israel visa requirements for any additional entry conditions
- Learn about Israel entry guidelines to know what to expect at the border
The ETA-IL process is designed to be quick and straightforward. With your documents ready and this guide open, you can complete your application in under 10 minutes and receive approval the same day.